GPS Watch Polarized Training: Master Zone 2 Metrics
By Keiko Tanaka • 14th Dec
When the trail gets dark and your fingers go numb, gps watch polarized training becomes more than a theory. It's survival. Polarized training with gps data must work without thought, in conditions where touchscreens fail and menus become indecipherable. You need metrics that mean something when you can't see them clearly (or feel them at all).
Polarized training follows an 80/20 rule: 80% low-intensity (Zone 2), 20% high-intensity. This method works, but only if your watch accurately captures where you spend those hours. Misplaced zones undermine everything. At 3 a.m. during sleet, misread data means minutes wasted fumbling instead of moving.
Understanding Polarized Training Through Cold Hands
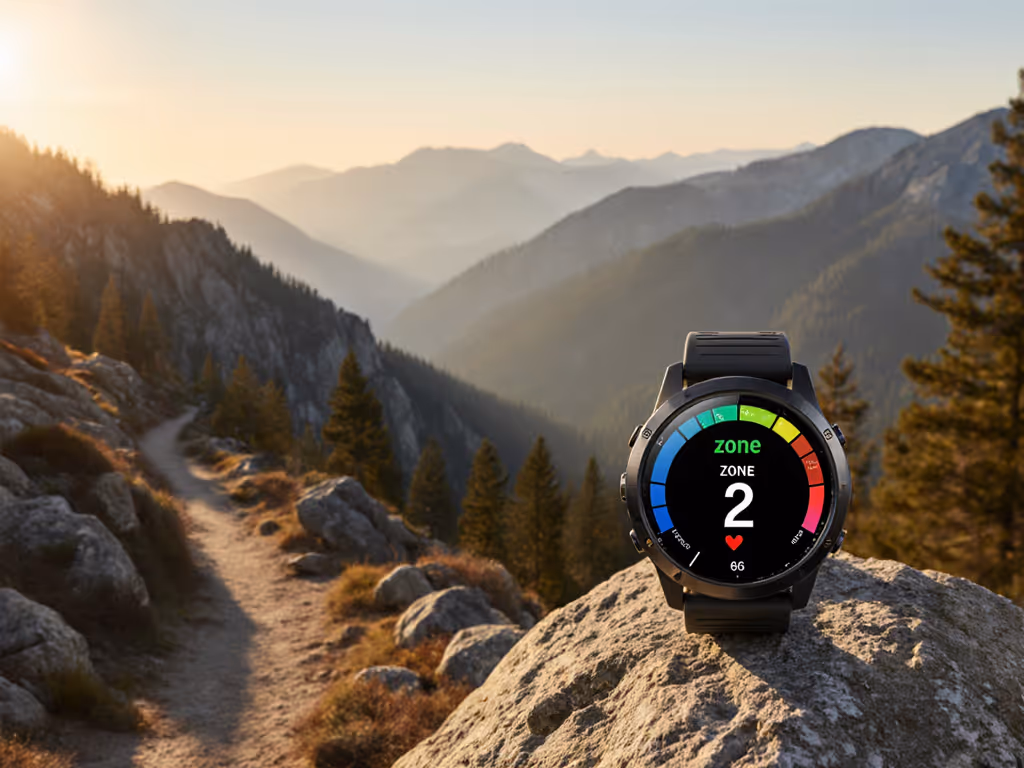
Polarized training divides your effort into clear bands. Zone 2 is conversational pace, where you could speak in full sentences without gasping. Zone 3+ is where words fail. The middle ground? That's the no-man's-land you avoid.
Most GPS watches misrepresent this split. Default zones drift with age, fitness, or even morning dehydration. You'll waste Zone 2 hours grinding in Zone 3 without knowing. Recovery stalls. Progress stalls.
Step 1: Setting Up Heart Rate Zones That Work in the Storm
Heart rate zones form the backbone of polarized training. But most athletes skip validation. They trust presets. Bad move when gloves obscure your screen.
Action steps:
- Conduct a field test before cold weather hits. Run a 30-minute time trial at maximum sustainable effort. Your average HR in minutes 20-30 is LTHR (lactate threshold HR). For sensor reliability during threshold tests, see our heart rate accuracy guide.
- Calculate zones: Zone 2 = 81-89% of LTHR. Zone 3+ = 90%+.
- Set physical confirmation points. On your watch, use vibrate alerts at 80% and 90% thresholds. If you can't feel it, you can't trust it.
Most watches auto-estimate zones. These change mid-run when you're chilled or dehydrated. Your Zone 2 becomes Zone 3. You're training opposite to your plan. I've seen this happen during descent when body temperature drops. You slow down physically but HR remains high. The watch misreads it as "Zone 2" when you're actually recovering from hard effort.
Step 2: Configuring Readable Metrics for Glove-Friendly Use
Your watch face must show Zone 2 status at a glance. For step-by-step setup, use our GPS watch customization guide. Not buried in menus. Not requiring touch.
Critical setup checklist:
- Bold numerical HR display that fills 30% of screen
- High-contrast color bands (red = zone 3, green = zone 2)
- Raised physical button assigned to "zone status" (one press shows zone percentage)
- No automatic brightness: set to max for storm conditions
If you're scrolling through menus during cold intervals, you're already off-plan. The watch UI should disappear. Metrics must work blind. Find it by feel.
Step 3: Executing Zone 2 Without Screen Glances
Zone 2 requires consistency. But checking your screen every minute disrupts rhythm. You're not training endurance, you're training screen-gazing.
Reliable execution protocol:
- Set interval alerts: 5-minute vibration for zone check. Short buzz = in zone. Two buzzes = too high.
- Calibrate with terrain: Downhill? HR drops. Compensate by increasing pace slightly before zone decay.
- Use pace as secondary metric: Zone 2 pace should feel sustainable for 3+ hours. If pace drops significantly while HR stays constant, terrain is fighting you.
I measure this in weather: One misty dawn, my watch vibrated twice at mile 3. Too high. I eased off. Heart rate settled into zone. Result: 45 uninterrupted minutes of true Zone 2. No screen glance needed. That's the standard.
Step 4: Tracking High-Intensity Work Without Touchscreen Fumbling
Zone 3+ intervals demand precision. But slick gloves and rain make touch interfaces useless. Your watch must handle this.
Critical features for high intensity intervals:
- Dedicated button to start/stop interval
- Audible countdown for work/rest periods ("30 seconds to go")
- Post-interval confirmation tone ("zone 3 achieved")
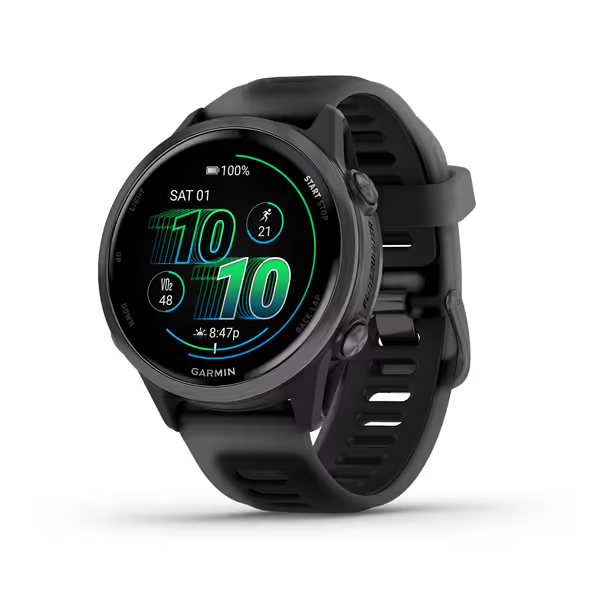
Garmin Forerunner® 570, 42mm
Advanced GPS running watch with brilliant AMOLED and multi-day battery.
$534.99
Battery Life (GPS Mode)Up to 18 hours
Battery Life (GPS Mode)Up to 18 hours
Pros
Bright AMOLED display with reliable button controls.
Coach plans and training readiness score for optimized workouts.
Excellent battery life and sleep tracking for recovery insights.
Cons
Accuracy and value for money receive mixed reviews.
Customers find this smartwatch to be an excellent upgrade from the Ultra model, praising its fantastic battery life and sleep tracking features. They appreciate the data quality and find it easy to set up, with one customer noting it takes just 2 minutes to configure.
Customers find this smartwatch to be an excellent upgrade from the Ultra model, praising its fantastic battery life and sleep tracking features. They appreciate the data quality and find it easy to set up, with one customer noting it takes just 2 minutes to configure.
Most training apps rely on touch for interval transitions. That fails when temperatures drop. One fingerless glove attempt later, your interval timing is shot. Look for watches that support physical button workflows throughout structured sessions.
Step 5: Analyzing Your Distribution Post-Run
Raw data means nothing. You need clear gps watch training distribution analysis. To turn time-in-zone into actionable decisions, read our training load analysis guide.
| Metric | Acceptable Range | Danger Zone |
|---|---|---|
| Zone 2 Time | 75-85% of total | <70% or >90% |
| Zone 3+ Time | 15-25% of total | <10% or >30% |
| Zone 2 Drift | <5% HR fluctuation | >10% variation |
Look specifically for time spent accidentally in Zone 3 during supposed Zone 2 runs. This kills the polarized effect.
If your zone 2 training gps metrics show frequent crossings into Zone 3, you're training harder than planned without recovery benefits. This mistake takes weeks to undo.
Failure Points in the Field
Three critical failures I've documented in polarized training heart rate zones:
- Cold-induced HR lag: During cold starts, heart rate reads low while perceived effort is high. You push harder to hit zone targets, blowing the session. Fix: Wait 10 minutes before zone monitoring begins.
- Barometer interference: Ascent rates affect zone calculations. Steep climbs register as higher intensity. Fix: Disable elevation compensation in zone settings.
- GPS drift in canopy: Under heavy tree cover, pace metrics become unreliable. Zone 2 becomes guesswork. For techniques to improve signal under tree cover, see our multi-band GPS guide. Fix: Rely on HR only when GPS signal drops below 3 satellites.
Summary and Final Verdict
gps watch polarized training only works when your device respects two laws of trail physics: Metrics must be accurate, and they must be accessible without thought.
If your watch requires touch navigation during intervals, it fails the sleet test. If zone data drifts with temperature, it's worthless for planning. True polarized training needs a device that works when you're cold, wet, and gloved, when cognitive load is high.
Look for watches that:
- Allow physical button navigation through all training metrics
- Show zone status in bold, high-contrast numerals
- Offer vibration alerts at zone thresholds
- Export clean training distribution data
Most importantly: Test it before you trust it. Run your polarized session in controlled cold (a walk-in freezer works). See if you can follow the plan without removing gloves. If you can't feel it, you can't trust it.
Find it by feel. Then keep moving.
Related Articles